
前后端协作的聊天室
前段时间在贵人家园写了一个聊天室的功能,由于是前后端分开协作,加之为了交付,所以没有实现得和自己想的一样,所以得空了又自己开了一个工程,从前后端到数据库到缓存都自己写一写。
工程介绍和搭建
后端我选择了nest.js的express核心,身为一个前端开发人员,自然要使用我们自己熟知的技术栈。nest.js是我非常喜欢的node框架,在易用性,开发速度上我个人认为比egg.js还要更舒服一些。
前端嘛还是vue3+typescript,样式基本都是手搓的,没啥组件。
nest.js工程搭建
npm i -g @nestjs/cli
nest new your-project-name
这样我们就得到了一个初始项目啦,它应该是长这样的
src
 ├── app.controller.spec.ts
 ├── app.controller.ts
 ├── app.module.ts
 ├── app.service.ts
 └── main.ts
基本的工程样子我们有了,来看看数据库的设计
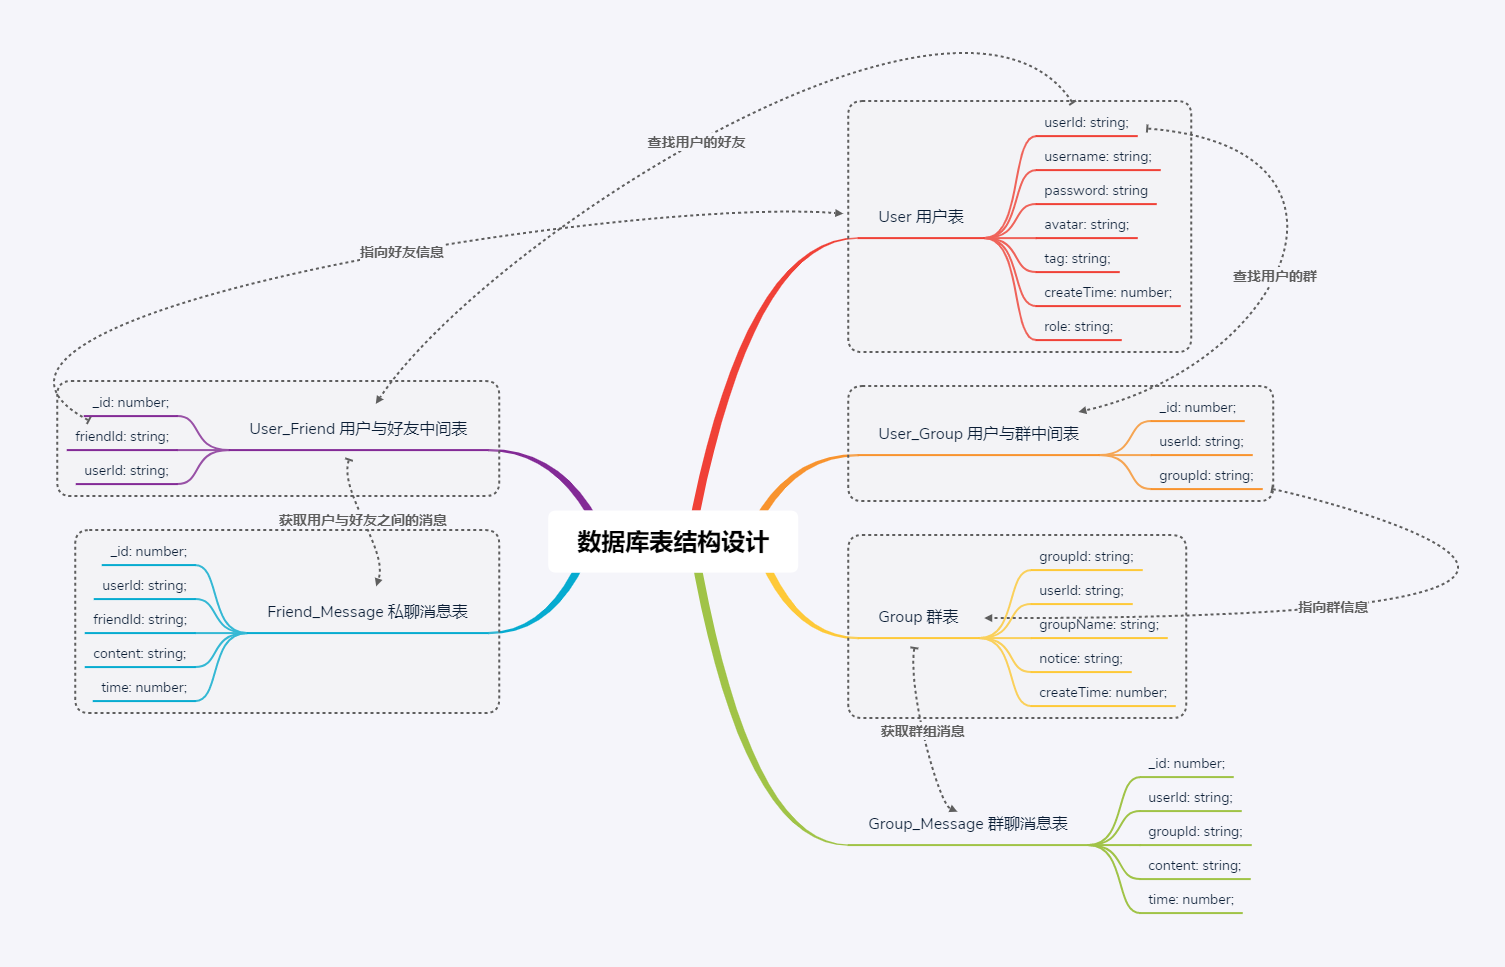
nest呢这里就不做教学了,跟着这个代码敲,肯定是能出效果的,但是要解释其中的原理篇幅太长。我们这里只实现私聊和好友的功能,群聊和私聊在后端意义上是一样的,包括前端实现的思路也是一模一样,所以咱做个私聊讲讲实现思路。
从数据库设计中我们可以看到,为了实现私聊和好友的功能,咱至少需要一个user表,一个friend-map表,一个friend-message表。也就是需要至少三个实体。对后端有了解的应该知道实体是什么,我们这里直接通过nest-cli生成 一个crud的模块
nest g res user
nest g res friend
在项目根目录执行后会生成两文件夹user和friend。
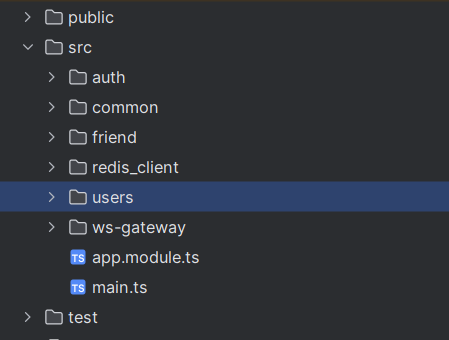
每个的结构都差不多,代码在git上,可以自行下载,实体也不赘述了。咱们接下来要说的是实现聊天功能的关键点-gateway
同样的,可以使用如下命令生成一个gateway
nest g ga gateway-name
在上面的项目结构中,ws-gateway文件夹就是一个socket.io的网关。
前端工程搭建
vue3工程搭建这里就不说了,无论是使用cli或者vite,只要能搭起来就行,因为我们不需要任何的第三方库,只需要vue自己的东西。
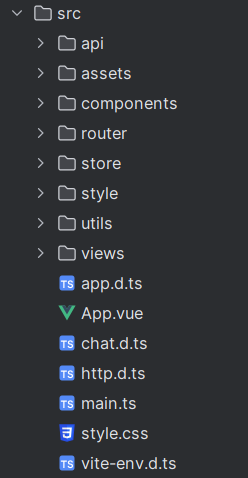
需要注意的是,这里我使用了pinia而非vuex,因为pinia现在是vue项目指定的状态管理工具。在项目中我使用了loadsh,不知道其它码友们有没有在使用,强烈建议把loadsh纳入自己的工具集。
gateway
一起来看看这个网关文件写了些什么
@Injectable()
@WebSocketGateway({namespace: 'events', cors: true})
export class WsGateway
    implements OnGatewayInit, OnGatewayDisconnect, OnGatewayConnection {
    private readonly logger = new Logger(WsGateway.name);
    @InjectRepository(FriendMessage)
    private readonly friendMessageRepository: Repository<FriendMessage>
    constructor(@Inject('REDIS_CLIENT') private readonly redisClient: Redis) {
    }

    @WebSocketServer()
    server: Server;

    afterInit(): any {
        this.logger.log('Socket.io 的服务端已经启动!');
    }

    async handleConnection(
        client: Socket,
        ...arg: any[]
    ): Promise<string | boolean> {
        // console.log(client.conn.transport.name) //查看由polling发起的还是由websocket发起的
        this.logger.log(
            `userId为${client.handshake.query.userId}申请建立socket连接`,
        );
        const jwt = await this.redisClient.get(
            client.handshake.query.userId + '_jwt',
        );
        if (jwt) {
            this.logger.log(`userId为${client.handshake.query.userId}建立socket连接`);
            this.redisClient.set(
                client.handshake.query.userId + '_ws',
                client.id,
                'EX',
                86400,
            );
            return JSON.stringify({
                code: RCode.OK,
                message: '成功在服务端建立socket缓存',
                id: client.id,
            });
        } else {
            this.logger.warn(
                `userId为${client.handshake.query.userId}建立socket连接失败`,
            );
            client.emit(
                'disconnectMessage',
                JSON.stringify({
                    code: RCode.FAIL,
                    message: '尚未登录或登录过期,无法建立连接',
                }),
            );
            client.disconnect();
        }
    }

    handleDisconnect(client: any): any {
        this.logger.log(`id为 ${client.id} 的Socket.io 的服务已经关闭`);
    }

    @SubscribeMessage('joinRoom')
    joinRoom(@MessageBody() data: string, @ConnectedSocket() client: Socket) {
        client.join(data);
    }

    @SubscribeMessage('sendFriendMsg')
    async sendFriendMsg(
        @MessageBody() data: { room: string; content: string, userId: string, username: string, messageType: string },
        @ConnectedSocket() client: Socket,
    ) {
        await this.friendMessageRepository.save({
            room: data.room,
            userId: data.userId,
            username: data.username,
            content: data.content,
            messageType: data.messageType,
            time: new Date().getHours().toString() + ':' + new Date().getMinutes()
        })
        this.server.to(data.room).emit('sendFriendMsg', {
            room: data.room,
            userId: data.userId,
            userName: data.username,
            content: data.content,
            messageType: data.messageType,
            time: new Date().getHours().toString() + ':' + new Date().getMinutes()
        });
    }
}
一行一行的看,首先创建了一个WsGateway的类,这个类对于nest来说就是一个网关,之后我们将这个类在app模块中注入就行了
// app.moudule.ts
providers: [WsGateway]
WsGateway分别实现了三个接口OnGatewayInit, OnGatewayDisconnect, OnGatewayConnection,这三个接口中各有一个方法,分别是网关的三个生命周期。
接下来看handleConnection,这个方法是一个监听事件,当有客户端对服务端发起连接请求时会先进入这里。log的代码先不管,我们看其他部分,就是从Redis中取出当前用户id 对应的jwt,如果存在,则允许连接。如果不存在,则不允许连接并且关闭当前的客户端实例。
再然后是joinRoom,通过joinRoom方法,可以将多个客户端放置到一个有特定id的房间中,然后向房间内发送消息,client.to向房间中的其他人发送,或者in方法向房间中的所有人发送。
最后则是sendFriendMsg,顾名思义,这是向好友发送消息的方法,通过server广播一条消息给房间里面的所有人,在这之前要将这条消息存入数据库。
到此为止,网关就已经完成了,并且已经被注册到了app模块中,项目运行时网关会启动,并准本一个命名空间为event的连接,客户端可以通过这个地址与服务端进行连接。
权限验证、登录
上面的网关中用到了检查jwt,在nest,或者说express中,jwt是借助passport中间件完成的,与其它框架一样,在登录时先执行local策略,local策略中表单内容进行检查,比如 username和password。在我们这个工程中,local策略位于auth的local.strategy.ts文件,我仅做了传递参数正常的校验,理论上这个位置应该从数据库校验。
@Injectable()
export class LocalStrategy extends PassportStrategy(Strategy) {
    constructor(private readonly authService: AuthService) {
        super();
    }

    async validate(username: string, password: string): Promise<any> {
        if (!username || !password) {
            throw new UnauthorizedException();
        }
        return { username, password };
    }
}
配合登录接口,能够完成对用户登录表单的验证,并且在登录成功后,生成一个jwt分配给该用户。
class AuthService {
    async login(data: CreateUserDto): Promise<any> {
        try {
            const user = await this.userRepository.findOne({
                where: { username: data.username, password: data.password },
            });
            if (!user) {
                return { code: RCode.FAIL, message: '密码错误', data: '' };
            }
            if (!passwordVerify(data.password) || !nameVerify(data.username)) {
                return { code: RCode.FAIL, message: '登录校验不通过!', data: '' };
            }

            const payload = { userId: user.userId };
            const token = this.jwtService.sign(payload);
            this.redisClient.set(user.userId + '_jwt', token, 'EX', 86400);
            return {
                code: RCode.OK,
                message: '登录成功',
                data: {
                    user: user,
                    token,
                },
            };
        } catch (error) {
            throw new HttpException(
                {
                    status: HttpStatus.INTERNAL_SERVER_ERROR,
                    error: '服务器异常',
                },
                HttpStatus.INTERNAL_SERVER_ERROR,
            );
        }
    }
}
数据库校验成功后,分配给当前用户一个jwt。除了auth部分的接口外,其它的接口都需要使用jwt模式进行验证。
@Injectable()
export class JwtStrategy extends PassportStrategy(Strategy) {
    constructor(
        @Inject('REDIS_CLIENT')
        private readonly redisClient: Redis,
    ) {
        super({
            jwtFromRequest: ExtractJwt.fromAuthHeaderAsBearerToken(),
            ignoreExpiration: false,
            secretOrKey: jwtConstants.secret,
        });
    }

    async validate(payload: any) {
        const { userId } = payload;
        const token = await this.redisClient.get(userId + '_jwt');
        if (!token) {
            throw new UnauthorizedException();
        }

        return { userId: userId };
    }
}
在jwt模式中,先对jwt进行了校验,然后将信息携带到controller的入口,使用@Request.user进行访问。
好友关系
上面做完了接口权限的验证,下面是添加好友这个功能。包括搜索用户,添加。
搜索用户
class usersService {
    async findUseIdOrName(data: string, userId: string) {
        try {
            //查找用户列表-除去自己
            const users = await this.userRepository //获取users实体仓库
                .createQueryBuilder('user') //创建一个查询,user是一个别名,它可以是a,b,c,d
                .select(['user.username', 'user.userId']) //筛选需要的列
                .where('user.username LIKE :searchTerm', { searchTerm: `%${data}%` }) //从username中模糊选出符合条件的项
                .andWhere('user.userId != :excludeId', { excludeId: userId }) //并且排除自己
                .getMany(); //获取所有符合的项
            return {
                code: RCode.OK,
                data: {
                    users,
                },
            };
        } catch (e) {}
    }
}
这样一个查询就完成了,其中使用typeorm完成了查询语句。随后就是添加好友了,为了简化操作,我这里并没有在发起添加请求之后往对方推送一个消息,而是直接添加完成了。
class FriendService {
    async create(createFriendDto: CreateFriendDto) {
        try {
            const friend = await this.friendRepository.findOne({
                where: {
                    userId: createFriendDto.userId,
                    friendId: createFriendDto.friendId,
                },
            });
            if (friend) {
                return {
                    code: RCode.FAIL,
                    message: '已经是好友了,无需添加',
                };
            }
            await this.friendRepository.save(createFriendDto);
            await this.friendRepository.save({
                userId: createFriendDto.friendId,
                friendId: createFriendDto.userId,
            });
            return {
                code: RCode.OK,
                message: '添加成功',
            };
        } catch (err) {}
    }
}
这个就没什么好说的,一个非常简单的请求和save。
前端页面
前端页面也非常简单,整体实现这样一个页面就行了,没啥难度。
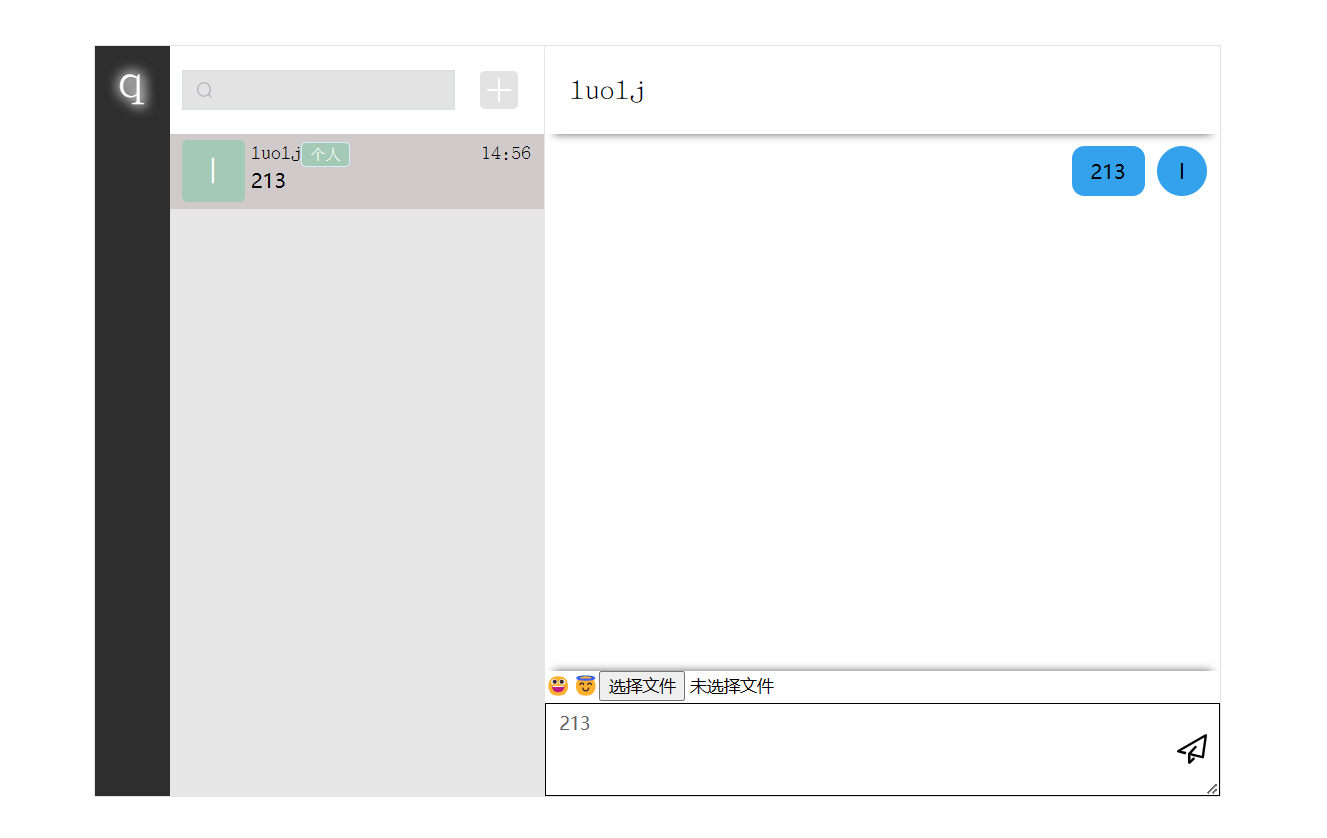
唯一要注意的是在角色列表和对话列表使用了element的滚动条组件。
前端数据传输
界面大伙都是写前端的,所以呢不做特别多的说明,我们来说一下数据怎么传输到页面上的。
我采用的方案是将socket连接和消息内容都放到store中统一管理,不以页面做单位了。这里的store我用的是pinia,所以就有下面这个代码。
onst userInfo = userInfoStoreHook();
export const useChatStore = defineStore("chatStore", () => {
    const chatFriendList = ref<friendChatItem[]>([]); //好友会话列表
    const chatGroupList = ref<groupChatItem[]>([]); //群聊会话列表
    const activeRoomInfo = ref<friendChatItem | groupChatItem>({room: "", messageList: []});
    const activeRoom = ref({room: ""});
    const socket = ref<any>(null); //会话对象
    //初始化socket
    const initSocket = () => {
        //连接socket.io服务
        socket.value = io("http://localhost:3000/events", {
            query: {
                userId: userInfo.user.userId
            }
        }); // 根据你的服务器地址和端口进行修改
        socket.value.on("connect", () => {
            console.log("Connected to server");
        });
        socket.value.on("disconnectMessage", (data: any) => console.warn(data));
        // 收到群聊消息,包括私聊
        socket.value.on("sendFriendMsg", (data: string) => {
            setFriendMsg(data.room, data)
        });
    };
    //加入一个房间
    const joinRoom = (id: string) => {
        socket.value.emit("joinRoom", id);
    };
    //发送好友消息
    const sendFriendMsg = (data: string,messageType='str') => {
        socket.value.emit("sendFriendMsg",
            {
                room: activeRoomInfo.value.id,
                content: data, userId: userInfo.user.userId,
                username: userInfo.user.username,
                messageType: messageType
            });
    };
    //获取到消息放入队列
    const setFriendMsg = (id: string, data) => {
        for (let i = 0; i < chatFriendList.value.length; i++) {
            if (chatFriendList.value[i].id === id) {
                chatFriendList.value[i].messageList.push(data)
            }
        }
    }
    //初始化已经加入的群聊列表和好友列表
    const initChatList = () => {
        findAllFriendApi().then((res: FindAllFriendRes) => {
            for (let friend of res.friends) {
                chatFriendList.value.push({
                    friendId: friend.userId,
                    friendName: friend.username,
                    messageList: [],
                    id: [userInfo.user.userId, friend.userId].sort().join("-")
                });
            }
        });
    };
    const getActiveInfo = () => {
        for (let chat of chatFriendList.value) {
            if (chat.friendId === activeRoom.value.id || chat.groupId === activeRoom.value.id) {
                activeRoomInfo.value = chat;
                joinRoom(chat.id);
                break;
            }
        }
    };
    return {chatFriendList, activeRoom, activeRoomInfo, initChatList, initSocket, getActiveInfo, sendFriendMsg, joinRoom, setFriendMsg};
});

export default function chatStoreHook() {
    return useChatStore(store);
}
<script setup lang="ts">
import {useChatStore} from "../store/modules/chat";
import {storeToRefs} from "pinia";
import {ref} from "vue";
import {useUserInfoStore} from "../store/modules/userInfo.ts";
import axios from "axios";
import {getToken} from "../utils/cookies.ts";

const chatStore = useChatStore();
const userInfoStore = useUserInfoStore()

const {activeRoomInfo} = storeToRefs(chatStore);

const sendMsgStr = ref("");
const sendMsg = () => {
  chatStore.sendFriendMsg(sendMsgStr.value)
}

const emojis = ['😃', '😄', '😁', '😆', '😅', '🤣', '😂', '🫠', '😉', '😊', '😇', '🥰', '😍', '🤩', '😘', '😗', '😚', '🥲',
  '🤗', '🫡', '🤐']
const getEmoji = (emoji:string) => {
  sendMsgStr.value += emoji
}

const uploadImg = (event:InputEvent) => {
  const file = event.target.files[0]
  const formData = new FormData();
  formData.append('file', file);
  axios.post('http://localhost:3000/users/upload',formData,{
    headers:{
      Authorization: 'Bearer ' + getToken(),
    }
  }).then((res:any)=>{
    console.log(res)
  })
}
</script>

<template>
  <div class="chat-content">
    <div class="chat-content-header">
      <span>
        {{ activeRoomInfo.friendName || activeRoomInfo.groupName }}
      </span>
    </div>
    <div class="chat-content-msg-list">
      <el-scrollbar>
        <ul v-for="msg in activeRoomInfo.messageList">
          <li class="msg-item" v-if="msg.userId !== userInfoStore.user.userId">
            <div class="msg-avatar">
              {{activeRoomInfo.friendName[0] || activeRoomInfo.groupName[0]}}
            </div>
            <div class="msg-content">
              {{ msg.content }}
            </div>
          </li>
          <li class="msg-item right" v-else>
            <div class="msg-content">
              {{ msg.content }}
            </div>
            <div class="msg-avatar">
              {{activeRoomInfo.friendName[0] || activeRoomInfo.groupName[0]}}
            </div>
          </li>
        </ul>
      </el-scrollbar>
    </div>
    <div class="chat-content-input">
      <el-popover placement="top" :width="200" trigger="click">
        <template #reference>
          <span>😀😇</span>
        </template>
        <div style="display: flex;flex-wrap: wrap;gap: 4px ">
          <div style="font-family: sans-serif" @click="getEmoji(item)" v-for="item in emojis">{{ item }}</div>
        </div>
      </el-popover>
      <input type="file" @change="uploadImg"/>
      <el-input
          v-model="sendMsgStr"
          :rows="3"
          type="textarea"
          placeholder=""
      />
      <div class="send-btn" @click="sendMsg"></div>
    </div>
  </div>
</template>
借助pinia的响应式,可以非常简单的将当前活跃窗口的数据放入到组件中,并且保持更新。
房间
在这个应用中,实现聊天的主要对象就是room,当然这也是socket.io的一个标准模型。房间的思想就是当前加入的人都能够获得房间内发出的消息,在其中的角色发出消息也会同步到房间内。 上面的代码中,store发起了joinRoom的请求给服务器,服务器执行了client.joinRoom的方法,就能将当前连接的角色加入到指定房间。
到此为止呢,一个独立的前后端工程就完成了,事实上,还有很多内容没有介绍到,因为这只是一种思路而非教程。
附加项
Redis
在nest或者说在node中使用redis有很多种方法,我这里采用了ioredis的做法。
npm install ioredis
import { Global, Module } from '@nestjs/common';
import { default as Redis } from 'ioredis/built/Redis';

@Global()
@Module({
  providers: [
    {
      provide: 'REDIS_CLIENT',
      useFactory: () => {
        return new Redis({
          host: '127.0.0.1',
          port: 6379,
        });
      },
    },
  ],
  exports: ['REDIS_CLIENT'],
})
export class RedisClientModule {}
如上所示,将redis作为一个独立模块导出,使其可以注入到app模块或者其它任意模块中使用。比如在一个service中
class FriendService {
    @Inject('REDIS_CLIENT')
    private readonly redisClient: Redis
}
Rxjs
之后补充 rxjs是一个比较大的篇幅
loadsh
之后补充 loadsh是一个比较大的篇幅
依赖注入
DI&IOC
做后端的小伙伴肯定已经将依赖注入学习过了,在spring中这是非常常见的,因为要实现切片,也就是控制反转。但是前端的小伙伴可能还不是很清楚这是什么意思。概念呢可以自己去了解一下,我们这里从js代码入手,带你看看依赖注入在前端是怎么实现的。
首先来看一段没有使用依赖注入之前的代码
class A {
    name: string
    constructor(name: string) {
        this.name = name
    }
}


class B {
    age:number
    entity:A
    constructor (age:number) {
        this.age = age;
        this.entity = new A('秦篆')
    }
}

const c = new B(18)

c.entity.name
这段代码有什么问题呢,乍一看好像什么问题也没有对吧,但是当我们的A被修改了之后,是不是也要同步的去修改B类。现在只有一个name属性,但是实际开发中,一个类中的属性是非常多的,而且除了属性,还有其它可能要增加或者减少的功能片段。 A与B的耦合关系导致了修改一个另一个就需要同步修改。为了解决这个问题,我们可以设计一种模式,我把它理解为一个中间件,代码如下。
class A {
    name: string
    constructor(name: string) {
        this.name = name
    }
}


class C {
    name: string
    constructor(name: string) {
        this.name = name
    }
}
//中间件用于解耦
class Container {
    modeuls: any
    constructor() {
        this.modeuls = {}
    }
    provide(key: string, modeuls: any) {
        this.modeuls[key] = modeuls
    }
    get(key) {
        return this.modeuls[key]
    }
}

const mo = new Container()
mo.provide('a', new A('帅比A'))
mo.provide('c', new C('帅比C'))

class B {
    a: any
    c: any
    constructor(container: Container) {
        this.a = container.get('a')
        this.c = container.get('c')
    }
}

new B(mo)
通过这种方式,b可以不理会外界的任何变化,因为它不需要从目标对象获取依赖,它的依赖来自于中间件。而中间件也不需要知道对方发生了变化,它只需要知道对方有属性即可。 这样就能达到依赖解耦的效果。
装饰器
来了解一下装饰器,上面的代码中,经常会出现@Injectable()这样的代码,在后端比较常见,但是前端其实也是需要使用的,接下来我们手写几个装饰器玩玩。 类装饰器:
function decotators (target:any) {
    target.prototype.name = '帅比'
}
@decotators()
class Person {
    constructor () {
    }
}
const person:any = new Person()
console.log(person.name)
属性装饰器:
const currency: PropertyDecorator = (target: any, key: string | symbol) => {
    console.log(target, key) //原型对象和key名
}
class Person {
    @currency
    public name: string
    constructor() {
        this.name = ''
    }
    getName() {
        return this.name
    }
}
参数装饰器:
const currency: ParameterDecorator = (target: any, key: string | symbol,index:number) => {
    console.log(target, key,index)
}

class Person {
    public name: string
    constructor() {
        this.name = ''
    }
    getName(name:string,@currency age:number) {
        return this.name
    }
}
装饰器的作用在于,它能够获取到装饰对象并且对其做出改动,而不需要去改动对象本身,这也是nest实现切面的重要手段。